


So far i have done 1 custom blog layouts.
Grip Design's Creative
This was my 1st one, she asked for green and purple, i didn't have 1 kit with both colors so she picked 2 kits and i mixed them.
I made everything to match and she also wanted a blinkie so i made one for a small fee.
I enjoyed making this layout and installing it for Celilia.
Friday, December 26, 2008
Monday, December 8, 2008


Wednesday, December 3, 2008
Another Award

Thank you Donna for this lovely award.
This award I Will Be Passing Around To My Favorite Blogs.The Following Blog's Have An AWARD On My Blog.
Changed Layouts
I have changed all the free layouts so they now fit widescreen monitor, please make sure you read the installation here.
Thank you to everyone who voted.
Enjoy the free layouts
Friday, November 28, 2008


Saturday, November 15, 2008


Thursday, November 13, 2008
Cute Xmas in Blue Layout Set

This Set includes...
1 layout background.
1 layout background for widescreen monitors.
1 Header for you to personalize.
1 Sidebar tag for you to personalize.
1 Set of instructions.
1 layout background.
1 layout background for widescreen monitors.
1 Header for you to personalize.
1 Sidebar tag for you to personalize.
1 Set of instructions.
You can Grab this for £2.50 approx $4.00 USD
Cute Xmas in Pink Layout Set

This Set includes...
1 layout background.
1 layout background for widescreen monitors.
1 Header for you to personalize.
1 Sidebar tag for you to personalize.
1 Set of instructions.
You can Grab this for £2.50 approx $4.00 USD
Wednesday, November 12, 2008
Denim Layout Set

This Set includes...
1 layout background.
1 layout background for widescreen monitors.
1 Header for you to personalize.
1 Sidebar tag for you to personalize.
1 Set of instructions.
You can Grab this for £2.50 approx $4.00 USD
Christmas Layout Set

All you need for Christmas
This Set includes...
1 layout background.
1 layout background for widescreen monitors.
1 Header for you to personalize.
1 Sidebar tag for you to personalize.
1 Set of instructions.
You can Grab this for £2.50 approx $4.00 USD
Monday, November 10, 2008
How to get rid of Dotted lines on the sidebar
Go to Customize Click Edit HTML, Look under the post area and you will find the following..
.sidebar .widget, .main .widget {
border-bottom:0px dotted $bordercolor;
margin:0 0 1.5em;
padding:0 0 1.5em;
}
Now all you need to do is change the 1px to 0px
Preview before Saving template.
Any problems, give me a shout.
.sidebar .widget, .main .widget {
border-bottom:0px dotted $bordercolor;
margin:0 0 1.5em;
padding:0 0 1.5em;
}
Now all you need to do is change the 1px to 0px
Preview before Saving template.
Any problems, give me a shout.
How to get rid of Dotted lines between posts
Go to Customize Click Edit HTML, Look under the post area and you will find the following..
.post {
margin:.5em 0 1.5em;
border-bottom:1px dotted $bordercolor;
padding-bottom:1.5em;
}
Now all you need to do is change the 1px to 0px
Preview before Saving template.
Any problems, give me a shout.
How to get rid of the image Border
Go to Customize Click Edit HTML, Look under the post area and you will find the following..
.post img {
padding:4px;
border:1px solid $bordercolor;
}
Now all you need to do is change the 1px to 0px
Preview before Saving template.
Any problems, give me a shout.
.post img {
padding:4px;
border:1px solid $bordercolor;
}
Now all you need to do is change the 1px to 0px
Preview before Saving template.
Any problems, give me a shout.
Friday, November 7, 2008
2 Column Custom Blog Service
 NEW: I now include a free blinkie in with this order.
Do you want your own custom blog set that no one else has?
Upon purchase you will recieve instructions on your next step.
I can use your kit, one of my kits or another kit as long as you ask the kit maker for permission.
You will get 1 layout, 1 header and Sidebar tag.
The layout style will be similar to the ones you see here on my blog.
Upon purchase you will recieve instructions on your next step.
I can use your kit, one of my kits or another kit as long as you ask the kit maker for permission.
You will get 1 layout, 1 header and Sidebar tag.
The layout style will be similar to the ones you see here on my blog.
This is only for Blogger Blogs.
This Service is $7.00
I've Been Tagged!!
I've been tagged by Misty so here's my answers:
1. How long have you been using PSP? About 6 years
2. How did you get into making tags, scrap kits etc...? I got fed up with hunting for them so thought i would make my own.
3. Who is your favorite artist? Keith Garvy
4. Who is your favorite scrap designer? I don't have a favourite, i love them all
and now i will pass this on to Beth
Wow another award

Thank you Misty for this gorgeous award.
The rules of this award are to say 7 things I love and to then pass this award onto 7 people.
Well 7 things i love are..
My 2 boys
My Partner
My Family
My Friends
Shopping
Scrap Kits
Recieving gifts, lol
The 7 people i am choosing are...
Thursday, November 6, 2008
Woot woot, My first Award

Thank you Misty from Butterfly Kisses for this gorgeous Award.
Now i have to pass it on, so many to choose from.
Saturday, November 1, 2008


How to get rid of the Header Border
Instruction Written By MissT
Go to Customize Click Edit HTML towards the top middle-right of your screen.
Scroll down the jumbled mess of words, letters, and symbols until you see this:
Header
-------------------------------------------------------------
*/
Replace the first three groups of words with this:
#header-wrapper { width:660px; margin:0 auto 10px;
border:1px $bordercolor; }
#header-inner { background-position: center; margin-$startSide:
auto; margin-$endSide: auto;}
#header { margin: 5px; border: 1px $bordercolor; text-align:
center; color:$pagetitlecolor;}
Now, click PREVIEW to see if it is what you want. DO NOT CLICK SAVE UNTIL YOU ARE SURE THAT THE HEADER LINES ARE REMOVED. You don't want to mess everything up and have to start all over again.
If you noticed, I just deleted the word "solid" out of the first and third little paragraphs. So you can do that too.
Installation of Your New Blog Header
Instruction Written by MissT
1. Click on the picture and save it to your computer.
2.Go into Customize. And in the little gray box that has your header name, on the bottom right you will see the word Edit. Click on that. It should pull up a smaller screen and BEFORE UPLOADING THE PHOTO, click on "Behind title and description" and "Shrink to fit". If you don't shrink to fit, it will be HUGE.
3.Then upload photo from computer and click save.
Thursday, October 30, 2008


Tuesday, October 28, 2008


Monday, October 27, 2008


Sunday, October 26, 2008


Monday, October 20, 2008


Monday, October 13, 2008


Sunday, October 12, 2008


Saturday, October 11, 2008


Friday, October 10, 2008


Thursday, October 9, 2008
How to install Layouts
You will need to set your template to MINIMA!
(Remember that you aren't going to lose your widgets)
1. Click "Customize" at the top right corner of your signed in page
2. Click "Add a Gadget"
3. Find "HTML/Java Script" and click "Add to Blog"
4. It should say Configure HTML/Java Script. In the large white box, paste this entire HTML code into that area:
<style type="text/css">body {background-image: url(direct link); background-position: center; background-repeat: no-repeat; background-attachment: fixed; }</style>
5. Left click on the layout you like. Then once the full size image is up, save it to your computer by right clicking and going to "save picture as" or "save image as" and upload it to your PHOTOBUCKET account under 1 Megabyte size and copy the DIRECT LINK. Leaving the bracket's, paste the link where it says DIRECT LINK in the code above. See the picture below.
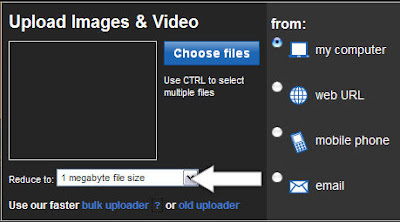
Don't hesitate to leave us a message if you have any problems.
PLEASE DON'T FORGET TO LEAVE A COMMENT WHEN YOU USE OUR LAYOUTS ;-)
Subscribe to:
Comments (Atom)


